![]()
![]()
![]()
![]()
![]()
![]()
![]()
![]()
![]()
![]()
![]()
![]()
Creating a Title Card ... Adding a Text Object
7. Each new stack normally has a title card or an opening card which attracts the user's attention and provides an introduction or clue regarding the content or theme of the stack. Our title card will include the following elements:
- A text object for the title
- Graphics
- A simple navigation button.
- An Exit button.
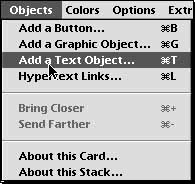
A title should be clear and easily understood by the user. Titles are best placed in a text object. Select "New Text Object" from the "Objects" menu (Figure 8).
![]()
8. A shimmering rectangle will appear on your card. This outline is known as a marquee or "marching ants". You can adjust the position of this marquee by dragging it around the card with a click-drag of the mouse.
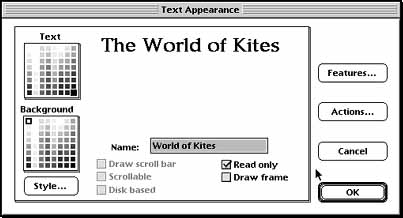
You can resize the marquee by "grabbing" the edges or the corners of the marquee with the cursor and then click-dragging the edges into the appropriate position. Once you are happy with the position of the text object click the mouse elsewhere on the card. This will position the text object and a "Text Object Appearance dialogue box" will appear (Figure 9). You can resize and move the text object later at any time if you so wish.
 Figure
9. Text Appearance Dialogue Box
Figure
9. Text Appearance Dialogue Box
You can make a number of changes to the appearance of the text object. These include...
- The colour of the text.
- The colour of the text object.
- The type of text object ... scrollable, framed or otherwise.
- Read only or editable by the user.
- The style of the text (font, size, etc.)
![]()
9.We will not make any changes till we have typed our stack title in the text object. Click "Okay" in the Text Appearance dialog box (Figure 9) and then type "The World of Kites" in the text object.
We shall now alter the appearance of the text object. In order to make changes we must adjust the mode of the stack. At this point it is in the "browse" mode. We need to change it to "edit" mode.
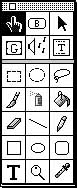
10. Select the Tools palette from the Tools menu and click-drag it down to the screen or card window. Click on the text object button on the tools palette (second row, far right) (See Figure 10). This will allow us to modify the text object.
11. Click on the text object. Once again it will shimmer with a marquee. Double click on the text object in order to "open" the Text Appearance dialogue box (Figure 9)
12. We want our stack title text object to be unframed and read only so check the "Read only" check box and uncheck the "Draw frame" check box.
![]()
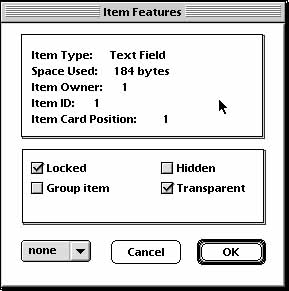
13. We shall also make an adjustment to the features of the text object. Click on the "Features ..." button in the Text Appearance Dialogue Box. The "Item Features" dialogue box will appear below (Figure 11). Click on the "Locked" check box and click okay. This will secure the text object. You may also make the "Text Object" transparent.
![]()
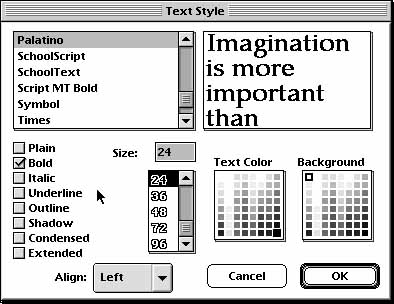
14. Adjust the text style of the text object. Click on the "style" button in the Text Appearance dialogue box. The following Text Style dialogue box will appear (Figure 12). Alter the text settings so that the text exhibits the following styles:
- Font: Palatino
- Style: Bold
- Size: 24
Once you have performed all these actions simply click OK for each dialogue box and you will have completed the text object.
![]()